Thursday, December 8, 2022

Christmas tree ornament earrings

 The most wonderful time of the year is coming, Christmas is here! For the biggest event of all time, I couldn't be miss the opportunity to make a themed jewel. And the symbol that better represents winter holidays is the Christmas tree, so I made these tree shaped earring that can also be a tree ornament for the occasion.


Copper wire with red and green agate stones to make a simple yet gorgeous piece of jewelry/ornament for my viewers.


Enjoy this tutorial and video on YouTube and Merry Christmas!

Supply and Equipment:

To make the tree shape, I use my wrap n tap pliers. I start by making the bail with copper wire and one by one I alternate straight parallel line one bigger than the previous resembling such as a serpentine and end it with another bail.

For the hook I also start with a bail on a piece of wire and with my fingers I made I round shape like a half circle. With my flat nose pliers, I made I sharp corner to close the hook. Cut to the right size and file the ends with my small needle file.

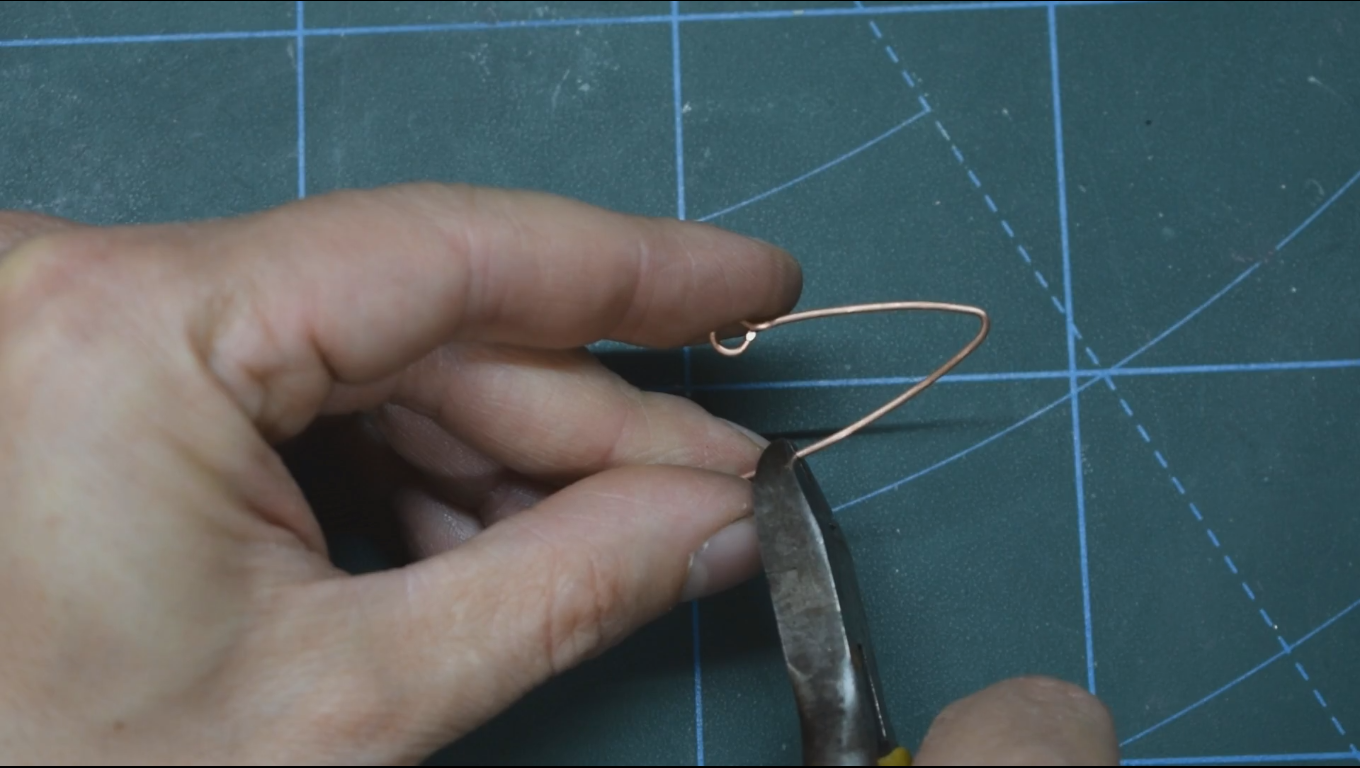
I then flat the corner on my anvil to give it strength, and then I attached them to the trees.

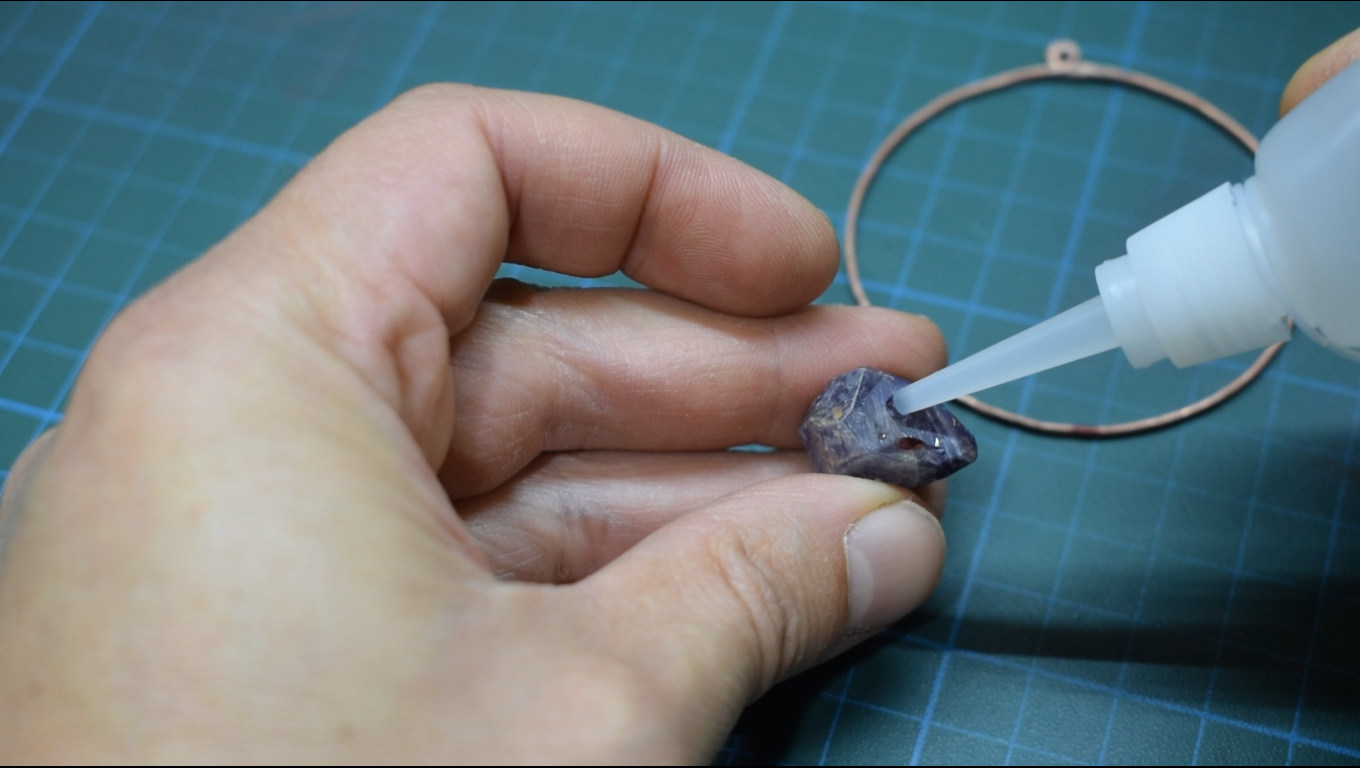
 I choose red and green agate stones that are the colors of Christmas. These agates don't have holes, and definitely I don't wanna pierce them. That's where electroforming start to play in this project.

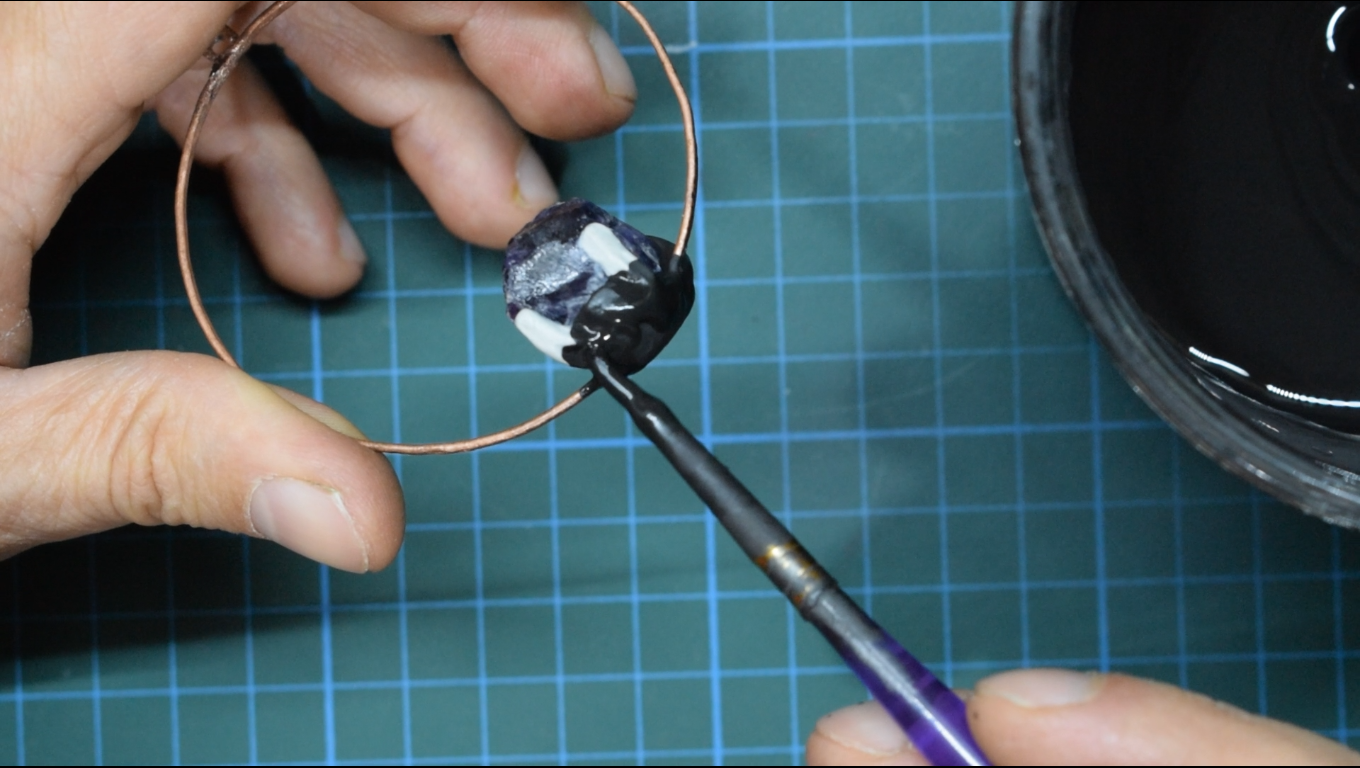
I use copper tape, which is conductive, to wrap all my stones on the narrow side to leave the face visible from the front of the jewel. 

 With a steel rod, I burnished all the copper tape's wrinkles that didn't got glued with just my finger pressure. Pushing the copper tape on the stone will make it be flat and there won't be any issues while electroforming.

 Now we can join all jump rings to connect each part. I wanna set red stones on top and the green ones on the bottom, so I'm gonna weld two bails on the red ones and only one on the greens.
Using my solder iron and just a small dot of tin solder, I attached them one after another. To help tin to stick on copper, I use flux.

In one of my old videos, I made crimp end caps, and I soldered them with the same technique. In that video I used a waxy flux that was very dirty with lots of residues and after the job I had to wash all pieces in acetone and put them to boil in hot water.


This time I use a clear no residues flux that doesn't need any other treatment after the soldering process so that my pieces are ready for the electroforming solution bath.


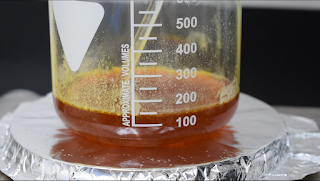
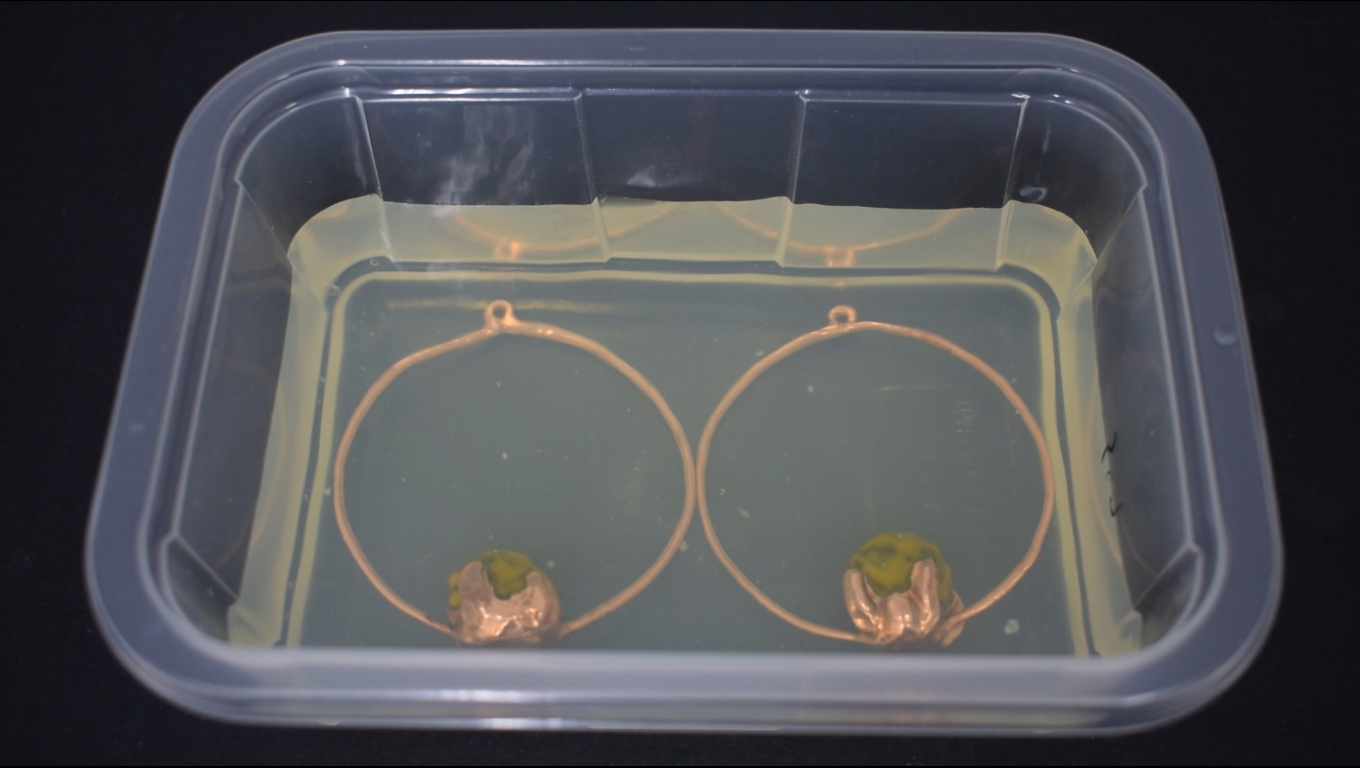
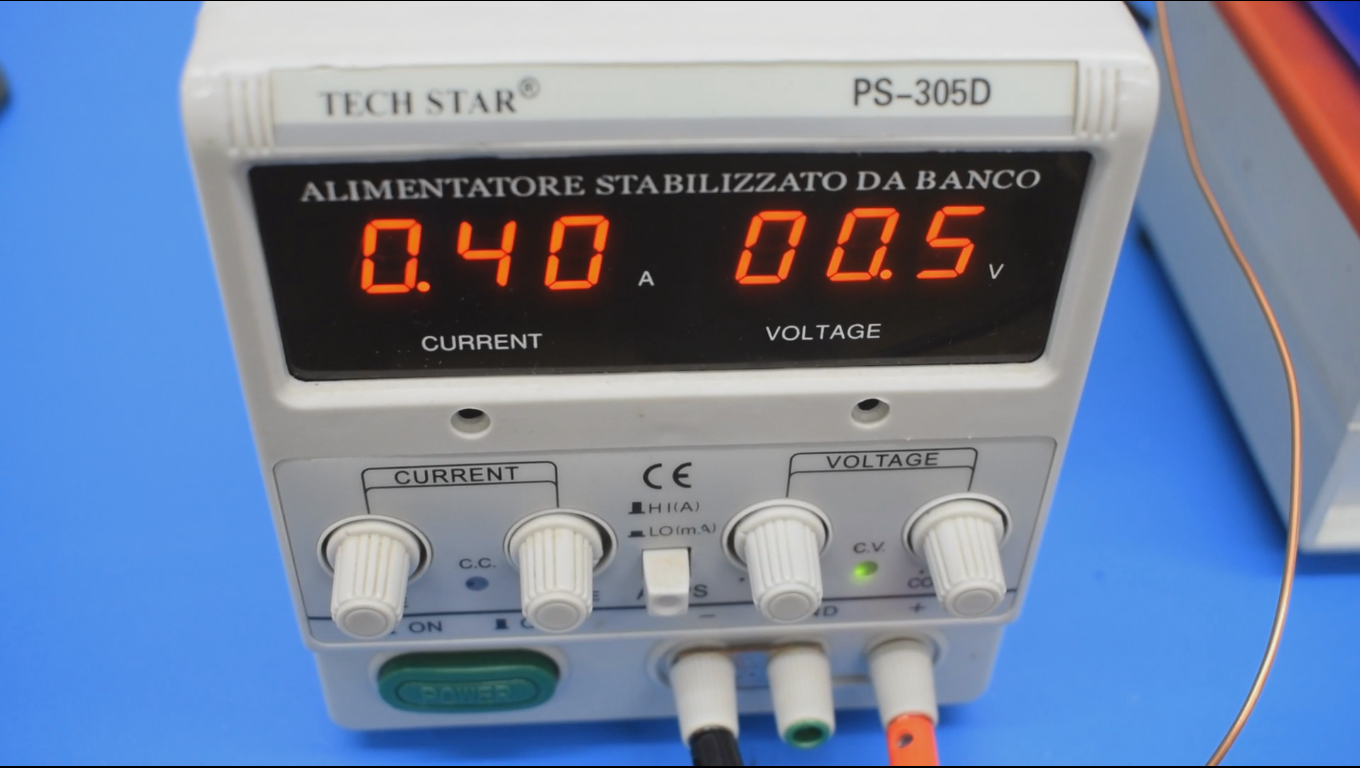
 Since I didn't use any conductive paint therefore all the parts that need to be electroformed are already metal, therefore in the tank, they will stay less than usual. I set my power supply at low current during the afternoon, and I set it on medium/high in the evening before I go to sleep.

 The next morning everything was bright and shine, so I removed them from the bath. But I was going to mount them on the tree part and I noticed that the wire's copper wasn't as bright as the one on the stones, so I decided to put those tree with the hooks attached in the tank for few hours to mach the stone's brightness.

 I finally set myself in mounting mode and join everything together. The hook on top, then the tree, the red stone and on the bottom the green one.

 I couldn't wait to make a photo shoot, so I spent the rest of the afternoon preparing and decorate my Christmas tree.

 And there you go, my Christmas Tree Earrings Ornaments.

Please watch the YouTube Video, Like and Subscribe.


 Thank you all of you and Merry Christmas, CuForming!


Saturday, December 3, 2022

How to make Liver of Sulfur and Colorful Patina on Copper


 There are different ways to make Patina on metal, but the most mysterious and still popular way to do it is with Liver of sulfur. In this tutorial, I will resume my three videos from YouTube about LoS. I will teach you how to produce LoS in different ways, and I will also show you how to use it to make different patina colors on copper.


In the first video, I will show you how to make it in less than one hour with small lab equipment.
This method is safe, but it requires a little care when we manipulate the substances.

Three simple ingredients are needed:

 The equipment needed is:

***Sodium Hydroxide also called Lye or Caustic Soda is dangerous***. BE CAREFUL WITH IT. If you are not familiar with it wear eye protection, wear gloves and use it with a fume extractor or in a ventilate area or even wear a respirator mask. Don't pour water in solid lye, it will start to splash all around. Don't put your face over the beaker. Don't touch it with wet hands if it is solid, don't touch it if it's dissolved, don't touch it at all. The solution is exothermic, it means that it's gonna get hot. Be aware that the temperature will reach 70 °C.

I'm doing it under my fume extractor, I don't recommend making it in under your kitchen hood, it's gonna make your kitchen stink for days. Do it outside.


Pour the distilled water in your beaker and turn on your stove to medium heat.


Add sodium hydroxide into the water and let it dissolve completely. 

When the solution starts to boil, add the sulfur powder and let it dissolve in to the sodium hydroxide solution. 

During this process we need to stir the solution once in a while with a glass stirrer (not necessary if we use a magnetic stirrer) and if needed we can wash the sides of the beaker with little water to let the sulfur go down. 


The solution will start becoming yellow, then orange and at the end dark red.


 Leave it to boil until all the sulfur is completely dissolved or when the color is very dark. Sometime, small particles of sulfur don't want to melt in the solution. It'll take around 30 minutes and when it's done we may wanna leave our solution to cool down. 

The liquid contains impurities and small pieces of undissolved sulfur that we don't want in the final product, so we are going to filter it. Two coffee filters a and a funnel on a sealed container are perfect. Pour the liquid and wait for it to drip entirely.


This is the final product and can be used as it is but, for convenience, I usually partition it in smaller glass dropper bottles ready to be use one drop at the time to make diluted solutions.


If you choose the right container, it will last for very long time.

Friday, November 11, 2022

How to make crimp end caps for pendants | Electroforming

The most common piece of jewelry is worn around the neck. Pendants and necklaces come out in an infinity of variety with a chain, a solid wire or a cordage. When using cords specifically, it's necessary to set a finding that allow to link the two extremities behind your neck. There are lots of options on the market, hooks, clasps, loops, caps, and ending of any kind but all machine made.

I wanted to make something organic that resemble the handmade style of my creations.
With an electrical wire terminal that it's crimpable and a bit of copper wire, I made by hands what I had in mind.

These are my handmade crimp ends or crimp end caps.


Supplies


Starting by removing the plastic sleeve from the terminal and keep the metal part that is gonna be the main body of our caps.

 With my wrap 'n tap pliers, I made a loop on a piece of copper wire that I set on top of the metal cylinder. I wrapped the wire around the body to secure the initial extremity, with a first coil on top, and then I made a second coil on the bottom. After that, I cut the excess wire and I bent the final extremity to keep it from sticking out.

With the same technique, I made a similar one with just one coil.

A third way to make a crimp end is to just make a loop with no coils.


After I prepared a bunch of pieces, I then set them up on my third hand to solder them with a common solder iron for electronics.
When I solder wires, I normally use flux. It makes the job easy and I can be sure that the solder tin goes inside all the crevices of the wire, making the join sturdy and firm. The downside of flux is that it's messy, and it's gonna isolate the surface of the metal. It's a greasy stuff and electroforming is not gonna work on it.

After I spent a few hours soldering every piece, I dip them in acetone. Sadly, it doesn't dissolve all the flux, but it does help to soften it. I then put them in a small pot with boiling water and left them for a few minutes. Seeing all the grease floating up on the surface of the water made me be sure that my pieces were perfectly clean and conductive, ready for the next step.

I also made a non soldering option with copper tape. I cut small strips of tape and wrap them around the tube to secure the copper wire loop. One on the top and one on the bottom to leave the middle part clear for crimping.

I then prepared a copper wire with a bunch of waves to hang all those little pieces inside the tank.


I dip everything into it and left it to electroform for 3-4 hours. This was more like plating the surface to give them the copper look, but also to make them more secure and sturdier.

Once I took them out of the bath I rinse them in water and dip them long enough, in a solution of liver of sulfur, to give them an antique look patina. Rinse again and let them dry.

Liver of sulfur is the chemical substance used to color copper and silver. It has an intense smell produced by the evaporation of the sulfides, just like rotten eggs. It's recommended to use a respirator mask or work in a ventilated area.
After we are done with our job, we need to neutralize it with baking soda or better with bleach or leave it to evaporate before flushing in the drain. It's a toxic substance, we don't want to contribute to pollution.


 The patina might change look with time, so I'm gonna protect them with Zapon lack. This is the boring part of this job. I have to dip them in zapon and centrifuge them one by one, or they will stick together in the process. Then I let them cure for 2 days.

Crimp ends are finished, and now they need to be mounted on cords. To do this, we need pliers of the right width. Any kind will do the job as long as they don't have teeth.

Insert the cord in to the hole and press the tube. Double coil crimps can be crimped in the middle. Single coil, on the bottom, and the no coil ones can be crimped on their entire body to become flat. Also, the ones with copper tape can be crimped in the middle, but they are not as cool as the wire ones.

They always go in pairs and, to complete the necklace, we can add a clasp or a hook for the closure.

I hope you liked this project and got inspired to make some of this small things.

Also watch the related YouTube video and subscribe my channel for more tutorial like this one


If you like them, but you are too tired to make them, you can find them on my Etsy shop:

https://www.etsy.com/listing/1327980293/2pcs-copper-crimp-ends-for-pendant

Thank you all by CuForming.


Sunday, October 30, 2022

I made amethyst hoop earring for my 500 subscribers

Thanks to all my 500 Subscribers. This is a fantastic checkpoint for my channel that I want to celebrate with all of you. For the occasion, I made a pair of hoop earrings that I want to giveaway to one of my faithful friends.

To participate, you need to subscribe to the channel and to leave a comment. Just type whatever you want and in which country you live. The lucky winner will be drawn between all the comments.

The winner will contact me on Facebook or Instagram for the shipping information. 2 more comments will be drawn just in case the first or the second winner won't show up.

I'm just sorry about the fact that I can ship to these countries only:
Andorra, Austria, Belgium, Bulgaria, Canada, Croatia, Czech Republic, Denmark, Estonia, Finland, France, Germany, Greece, Hungary, Ireland, Italy, Latvia, Lithuania, Luxembourg, Monaco, Norway, Poland, Portugal, Romania, Slovakia, Slovenia, Spain, Sweden, Switzerland, The Netherlands, United Kingdom, United States.
If you don't live in one of these countries, I won't be able to ship the giveaway.

Thank you all!!!


Supplies:

 When you beat copper it becomes stronger, when you warm this metal it becomes soft and malleable.


With a hammer, I'm flatting the copper wire. This is the first step to create its look.


When I bent it on my wooden mandrel, it feels strong, and then I warm it up with my torch.

Quenched in water and pickled in pickling solution to remove fire scales, it can be easily bent in to shape.

With wrap 'n tap pliers, I made a small loop on one end and trim at the right measure with nippers. I've repeated the process twice, since earrings are usually two.


I set both pieces at the same time on a heat-proof surface. Adding a small piece of braising alloy, I have joined them with my butane torch. The right heat is sufficient to melt the alloy, but not the copper.


I repeated the quenching and pickling process to clean the surface of the copper and decided to give some character by texturing the sides with my DIY texture hammer. I choose a linear patter.


To complete the shaping process, I used a rubber hammer to make them straight and also to give them much more strength.

To attach the amethyst crystals, I simply glued them with CA glue on the hoop's bottom. 


After I left them a few minutes to dry, I mixed some Apoxie sculpt. A little flat piece on the bottom is perfect to secure the crystal with the copper and to hide the gap in between. Four small oblong pieces at the sides are attached to resemble prongs and to make more grip as well.


I smooth the surface of the resin with a silicone brush and isopropyl alcohol.


After a day of waiting to let the Apoxie cure completely, they were ready for the conductive paint.
It takes less than five minutes to dry, so I can give them a second coat right away.


I'm now applying liquid latex on the stones.

This is a procedure that I usually don't apply to quartz crystals or any other stone with hardness higher than 6 in the mohs scale. In this case, I'm using raw crystals, and I'm not sure if they have cracks. If so, the electroforming solution could penetrate inside and the copper sulfate contained, once crystallized, can push in to those cracks and break the stones.


Once the latex is completely dry, our earrings are finally ready for the most important part of the job, the electroformation itself. In the electroforming solution, they will get coated in copper through an electrochemical process called galvanization.

It takes several hours to be completed, so we can sit back and relax for a while, but always keep an eye on them and move them once in a while to avoid the hooks, that we made to hang them, don't get incorporated in the piece.

The power supply needs to be started at low amps at first. It can be adjusted once the part with graphite is coated in copper and let them to electroform with a good amount of copper on them.


In this case, I was happy with the thickness of the copper after 17 hours. I took them out of the bath to rinse with water and remove the copper sulfate residue on them.

I then prepared a container with distilled water and Liver of sulfur. I drop the earrings in it not for long to get a rainbow patina.
In the video, you can see me using my bare hands to move the hoops in the liver of sulfur solution... DON'T DO THAT. I was in a hurry and I forgot to wear gloves. If you do touch liver of sulfur with your skin, wash it good, it's a toxic substance and can cause troubles.


It also has an intense smell produced by the evaporation of the sulfides, just like rotten eggs. It's recommended to use a respirator mask or work in a ventilated area.
 Not only that, after we are done with our job, we need to neutralize it with baking soda or better with bleach. You can also leave it to evaporate before flushing in the drain. We don't want to contribute to pollution.


  After I peeled off the latex from the stones, I dipped them in Zapon lack to protect patina's color. Sadly, I don't have the footage and I couldn't show this part of the process in the video.

I mounted a pair of earrings hooks and make them ready to be shipped to the lucky subscriber that is going to comment on the YouTube video.


Don't forget to leave a comment to win the giveaway.


 Thank you all by CuForming!!!


Necessary Steps

How to Make Patina on Copper with Everyday Items

  Achieve Stunning Patinas on Copper with Everyday Items! Copper's natural beauty is undeniable, but a patina adds a whole new level of ...