Are you ready to dive into the world of creative craftsmanship and jewelry-making? In this guide, we'll walk you through the fascinating process of creating copper electroformed stud earrings. With this simple technique, you will be able to electroform stud earrings with copper without plating the earring post. So, gather your supplies, unleash your creativity, and let's get started!

Supplies You'll Need:
- Earring posts (non-oxidizable metal) https://amzn.to/3qNtE1Q | https://ebay.to/3qI4jqi
- Stones or crystals of your choice https://amzn.to/3KVqzni | https://ebay.to/3YRjt92
- Silver Paint https://amzn.to/3Ph6fQ1 | https://ebay.to/3R4T3ia
- Conductive paint https://amzn.to/3QXZJyL | https://ebay.to/3QSbEy5
- Nail Polish https://amzn.to/3PdGeki | https://ebay.to/3R2UMox
- Liquid latex https://amzn.to/3QYVxio | https://ebay.to/47RlaYf
- CA Glue https://amzn.to/3KYT0AP | https://ebay.to/3EfOrhD
- Wire (thin multi-strand electrical wire) https://amzn.to/3Efz3C8 | https://ebay.to/3QQZwgO
- Wire stripper (optional) https://amzn.to/3PcpYjK | https://ebay.to/3L0ehtN
- Rotary tool (optional) https://amzn.to/47NcAd4 | https://ebay.to/44B9mqs
- Liver of sulfur (optional) https://amzn.to/47QVQSb | https://ebay.to/45qwRDP
- Acetone https://amzn.to/3Pfsq9e | https://ebay.to/3UGNC7W
- Pliers https://amzn.to/3L0EhVX | https://ebay.to/3Rf22Of
- Brushes https://amzn.to/3OLmQda | https://ebay.to/3PgEXJe
- Apoxie Sculpt https://amzn.to/44ujr8v | https://ebay.to/3QScgDT
- The complete electroforming equipment https://kit.co/cuforming/electroforming-advanced-kit
Step-by-Step Process:
1. Preparing the Stones: Begin by selecting the stones or crystals you'd like to incorporate into your earrings. Glue these stones onto the earring posts using CA glue, ensuring they are level and secure. Allow the stones to cure.

2. Painting Translucent Stones: For stones with translucency, use a silver sharpie to color the back surface. This creates a mirror effect that enhances the stone's reflection.

3. Protecting Carbonate Stones: If using stones with a carbonate composition or a hardness lower than 6 on the Mohs scale, protect them by applying a coat of clear nail polish. Ensure that all exposed surfaces are covered.

4. Applying Graphite Paint: Coat the conductive paint with a layer of thick graphite paint. The graphite paint should make contact with the metal to ensure proper conduction.

5. Connecting the Wires: Wrap thin electrical wire around the posts to create a connection between the stones and the conductive mixture. A rotary tool can make this step quicker and more precise.

6. Protecting the Posts: Use liquid latex to cover the earring posts completely. This protective layer will prevent copper plating on the posts, preserving their original metal.

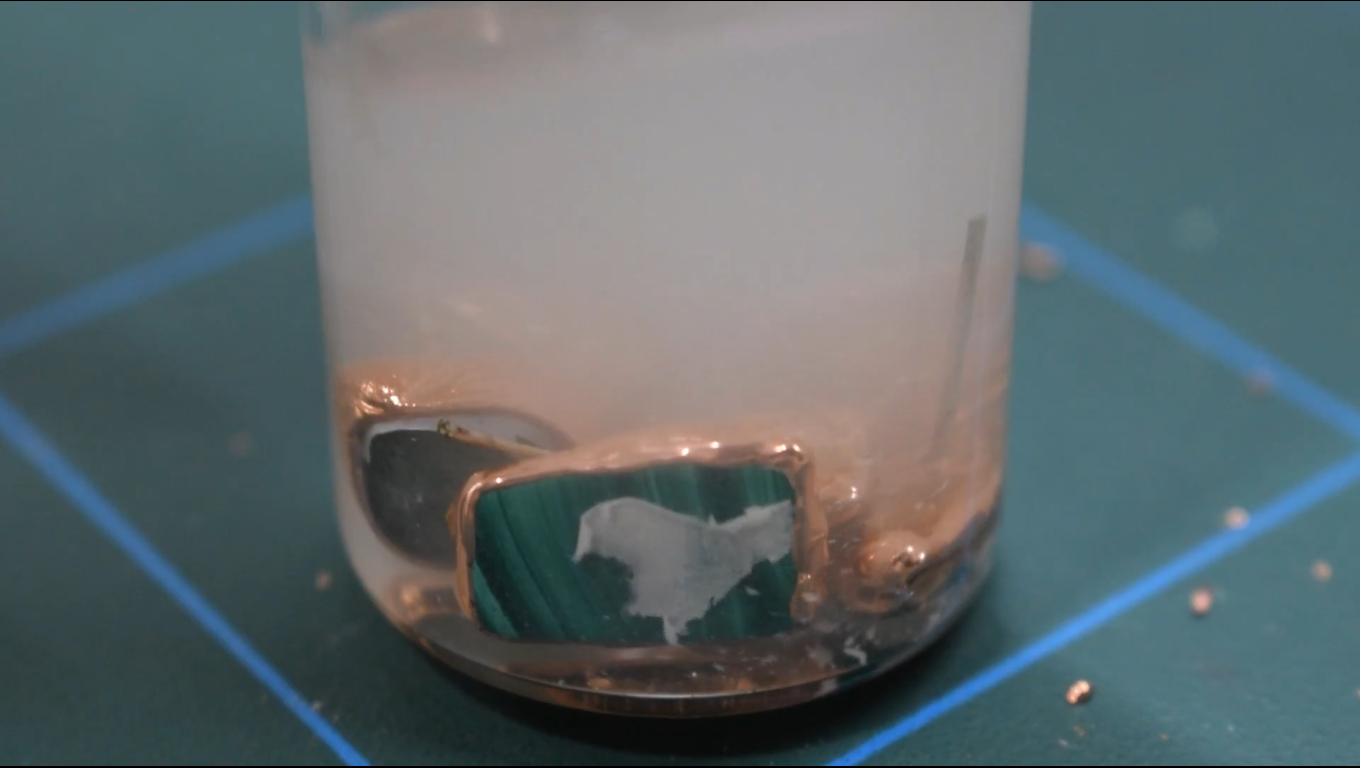
7. Electroforming Process: Place the earrings into the electroforming bath, where they will receive a copper plating. The copper will deposit on the conductive areas, but not on the latex-covered posts.


8. Unveiling the Finished Earrings: After sufficient time in the electroforming bath, remove the earrings and wash off any residue. Rinse off any remaining protective coatings with acetone. You'll now see the stunning transformation of the copper-plated earrings.
9. Optional Patina and Finishing: If desired, apply patina solution to enhance the texture and depth of the copper. Rinse with water and polish the earrings with a cloth to achieve a beautiful shine.

10. Admire Your Creations: Finally, unveil your handcrafted copper electroformed stud earrings, each a true testament to your artistic flair and skill. Feel free to experiment with different stones, shapes, and patinas to create a range of unique pieces.


Creating copper electroformed stud earrings is a fascinating journey that combines artistic vision with technical finesse. By following these step-by-step instructions, you've unlocked the potential to craft beautiful, one-of-a-kind jewelry pieces that show your creativity and mastery of the electroforming technique. So, put your skills to work, and let your imagination run wild as you continue to explore the world of electroforming jewelry-making!

If you want to see how to make these earrings, check out the video on YouTube.
Don't forget to subscribe to my channel for more electroforming tips and tutorials.
I
wanna thank everyone who has read this blog and has shown an interest
in electroforming. I hope that you have found it informative and
helpful. Happy electroforming! CuForming!


