Upgrade Your Electroforming Setup with This Ingenious Solution - Anode cage

Upgrade Your Electroforming Setup with This Ingenious Solution
-Anode cage-


Electroforming is an exciting process that allows you to create intricate copper objects with unique textures and shapes. However, connecting multiple copper anodes to the power source can be a real challenge. That's where an anode cage comes in.


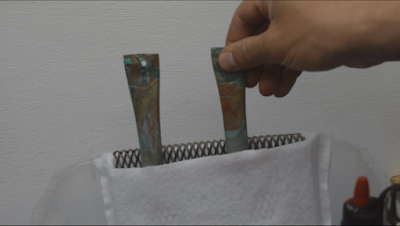
An anode cage is a conductive grid made of a metal, such as titanium or platinum, that is inert to the acidic environment of the electroforming tank. It connects multiple copper anodes together and holds them securely in place during the electroforming process. This eliminates the need for clips and wires, simplifying the setup and improving the overall efficiency of the electroforming process. 


To make an anode cage, start by cutting a plane grid of titanium or platinum in half and shaping it to fit the dimensions of your electroforming container. You can use an angle grinder and a hammer to shape the cage. Once you have the shape you need, prepare an anode bag that fits the cage and slip it in easily with the help of two soft plastic sheets.


Fold the hanging part of the cage and attach the positive pole clip to the outside of the tank. The cage acts as a framework that securely holds the copper anodes in place, so there's no need to worry about them moving around during the electroforming process. Another advantage of using an anode cage is that all the unused copper pipe pieces can be used, eliminating waste. 


Using an anode cage simplifies the electroforming process, making it more efficient and producing high-quality copper objects. So, next time you're planning to electroform, consider using an anode cage and experience the difference for yourself!
 

If you are looking to buy an anode cage for your electroforming projects, you can find them easily on popular online marketplaces.

Here's my affiliate links:

Titanium mesh 30x20x1cm: https://ebay.to/3C7qYOR Titanium mesh 30x20x0.5cm: https://ebay.to/3IVQUAR
Titanium mesh 20x5cm (small): https://amzn.to/42tnaCj 

The anode cage is a versatile and efficient solution for the electroforming process. With its help, you can simplify your setup, improve efficiency and eliminate the need for additional clips. Using an anode cage will save you time and helps to reduce waste by utilizing unused copper pipe piece.

If you want to see how to set up the anode cage in your electroforming tank, check out the video on YouTube.


Don't forget to subscribe to my channel for more electroforming tips and tutorials.

I wanna thank everyone who has read this blog and has shown an interest in electroforming. I hope that you have found it informative and helpful. Happy electroforming! CuForming!


Comments

Popular posts from this blog

From 3D Printing to Electroforming - Here's my Unique Wings Pendants

  How to Make Magical 3D Printed Electroformed Wing Pendants! Hey everyone! 🌟 Today, we're going on a super fun and creative adventure. We're going to make magical pendants with 3D printed wings of butterflies, fairies, demons, and angels. This project combines the wonders of 3D printing with the process of electroforming to turn simple ideas into jewelry pieces. If you love getting creative and adding a bit of sparkle to your crations, you're in the right place. I'll take you through each step, from designing and printing to assembling and electroforming.  Grab your supplies and let's get started on this magical journey together! 🦋✨ Supplies and Materials Design and 3D Printing My pre-made designs  https://website.beacons.ai/cuforming/3d-printables-shop 3D printer  https://amzn.to/45dxFg5 |  https://ebay.to/3WVt5ko Resin  https://amzn.to/3VeiGif |  https://ebay.to/3RWJcLZ UV Lamp  https://amzn.to/3wNMJ7e |  https://ebay.to/4bR9R3E Smoot...

How to Make Patina on Copper with Everyday Items

  Achieve Stunning Patinas on Copper with Everyday Items! Copper's natural beauty is undeniable, but a patina adds a whole new level of depth and character. While natural patinas take time to develop, this tutorial will show you how to use readily available household items to create stunning patinas on copper quickly and easily. Material you need: Copper jewelry Copper wire https://amzn.to/3Q3yOjO | https://ebay.to/3JiRCIb Spray bottles https://amzn.to/4aQYZSA | https://ebay.to/3U32G0Y Containers  https://amzn.to/3vQyMF9 | https://ebay.to/3W1zyK2 Plastic wrap Ammonia https://amzn.to/3U339jK | https://ebay.to/4cZTBhT Vinegar Distilled water Table salt Baking soda Soy sauce https://amzn.to/4d1pIy2 | https://ebay.to/4cQLcxg Cooked rice Paper towels Ziplock bags Wood chips Protective gloves (optional) Eye protection (optional) Brush (optional) Clear lacquer https://amzn.to/4d0HEZg | https://bit.ly/3vXnr6b The Experiments. Get ready to experiment and create a spectrum of col...

How I Anodized Titanium Hooks for My Copper Earrings

  Hello, fellow makers! Today, I’m sharing a fun project I just finished: anodizing titanium hooks for a pair of copper earrings I made. I wanted to experiment with color on the hooks to match the patina on the copper. Here’s how it all went down, complete with a few lessons learned along the way! Materials You’ll Need Before diving into the process, here’s a list of all the materials I used: Titanium hooks (or titanium wire) https://amzn.to/4eJOIdg | https://ebay.to/4fnZg1Z Baking soda (for the electrolyte solution) Water (to mix with the baking soda) Beaker (or any non-metallic container to hold the solution) Stainless steel bar (to use as the cathode) Alligator clips (to connect the titanium and stainless steel bar to your power supply) 30-volt, 5-amp adjustable power supply (or a higher voltage 60V power supply for anodizing) https://amzn.to/3BIhjkT | https://ebay.to/3zXqxJq Why Titanium? First things first: why titanium? Well, titanium is hypoallergenic, which makes i...