Sunday, June 26, 2022

Blue Ceramic China with Blue Patina - Electroforming experiences

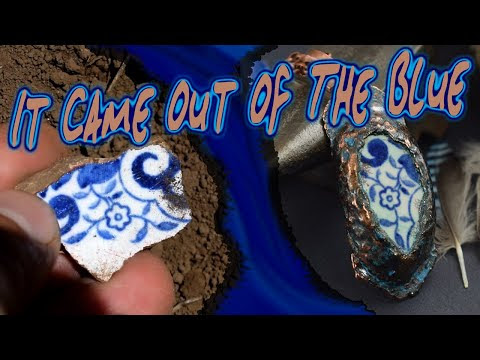
 The color is blue!

 For this project, I used a ceramic piece that I've found in the field. 

I'm not a mudlarker, but everyone who find a treasure won't miss the opportunity to grab it.

Instantly, when I saw that little blue sunk into the soil, I knew what it was. What I didn't know it was that I was going to collect a flower that it wasn't from a plant.

I believe that everything can be electroformed, and I did.

This piece of blue ceramic must be from an old plate. I don't live in a historical place, so I think it could be from the sixties.

The blue color prompted me to experimenting more with patinas. In my latest video, I tested ammonia on copper, and it was a fail. But the advice of one of my subscribers was enlightening.


It all came out in/(of the) blue.

Supplies:

  • Piece of ceramic
  • Copper sheet
  • E6000 glue
  • Apoxie Sculpt
  • Conductive Paint
  • Distilled water
  • Vinegar
  • Ammonia
  • Table Salt (NaCl)
  • Rotary Tool
  • Diamond cutting wheel
  • Sheet metal shears
  • Ball peen Hammer
  • Texturing Hammer
  • Rubber Hammer
  • Drill press
  • 3 mm drill bit
  • Silicon brush
  • Balled tool
  • Brush
  • The entire electroforming equipment
  • Sealed container
  • a piece of plastic net
  • tooth brush
  • Rotary bristle brush 2000 grit

 With my rotary and a diamond cutting wheel, I shaped the piece of ceramic like a drop. It helped me my DIY water dropper to avoid all the dust from the ceramic to surround my lab and cause health problems for may respiratory system.


Then I cut a piece of copper sheet a little bigger than the ceramic piece with shears for metal sheet.

I used three hammers to flat and texture it.
To flat it down and remove the sharp edge, I used a ball peen hammer. For the texture, my DIY hammer with small squares was my first choice. And with the rubber hammer I made straightened everything.


The hole for the chain was made with a 3 mm drill bit.


To join the ceramic and the copper together, I used the E6000 glue. It's the perfect choice for this kind of connection between different materials. It takes 24 hours to cure, but the time is worth it.


Now in between the two parts there is a gap that I'm gonna fill with Apoxie Sculpt. This material comes with A and B parts that need to be mixed together in equal parts. It's mandatory to use gloves while mixing it because the two parts separated are toxic. But after completely knead, it's safe to the touch.

I made little sausages and wrapped them around the border. A silicon brush helped me to shove them to the hollow spots. With a balled tool, I've closed all opened fringes.


With the same bolt of my DIY texturing hammer, I replicate the same design of the copper sheet onto the apoxie.


When I was sure it was completely dry and hard, I start to cover every non-conductive part with conductive paint. I applied two coats, 30 seconds, one from each other. This conductive paint dries really fast. Anyway, I left it an hour to rest in order to let the graphite activate and become more conductive.

It's now time for the real process of electroforming.
I dipped it in to the tank and set my power supply to the minimum current, but after an hour I realized that it wasn't doing a thing and I had to lift the current up a little.


I left it on its own for 12 hours to get ready. I thought it was covered in copper very well, but I noticed a little spot that was still black from the conductive paint. Sometimes you need to pay more care when coating your pieces with graphite. I repainted the missed patch and dipped it in for 2 more hours.


I washed it with distilled water, and It was finally ready for the next step.


For the patina, the process is simple. First you need to spray or brush on the copper some white vinegar and sprinkle on it some table salt. At first, I used coarse salt, but after a while I added some fine one.


To prepare the fumes chamber, you need a sealed container with some ammonia on the bottom and something that can keep the piece up. I used a piece of plastic net.

Now you just leave it inside, all sealed up, and wait.

5 hours later I took it out, and it was, in my opinion, very cool. When it got dry, it was great. It needs to be clean, though. The oxide is crumbly. With a toothbrush, I removed all the loosing powder.


To make it shines I gave it a very quick sanding with Rotary bristle brush 2000 grit.

I think the patina came out great, and I hope you enjoyed this project as well as I did.

Please check the video on YouTube and don't forget to subscribe.


Thank you all by CuForming!!!

Thursday, May 19, 2022

Copper Electroformed Miniature Tree


May 16th is a day of love for nature and especially for trees. It is the “Hug a Tree” day and for the occasion I wanted to make a miniature tree made out of copper and I used Aventurine pebbles to resemble leaves.

 Tools and material:

From the pruning I saved last time I cleaned my Lemon Tree, I choose a branch that looked perfect to be the trunk.


The nippers weren't strong enough to cut big parts, so I used my bandsaw to do the job.
Then I cut small parts to make other branches.


With a round burrs bit and my rotary tool, I made holes on the trunk to glue the branches. I tried to make it more organic possible. CA glue was the best choice to do this part.


For the base, I used a piece of cork that I found on the beach. I made a hole of the same diameter of the trunk with my drill press. In this case, I used a 10 mm bit. 


After I glue them together it starts to take the shape of an actual tree, but it was not enough natural and then, with Apoxie Sculpt, I made some roots on the bottom.


I mixed the A and B parts with gloves because the two parts separated are toxic to be touched, but once they are combined, this putty is safe for the skin.


I made a few pointy sausages and put them all around the trunk.


With a silicon brush I made wrinkles and with a balled tool I try to make the Apoxie to stick better on the wood.


After 12 hours of drying, I dip the piece in my Conductive Paint. The container was too narrow for the tree top, so I had to use a brush for the missing spots.


To resemble leaves, I pulled out of my stash these Aventurine tumbled pebbles. This time I used UV resin to glue them on the branches. I know that UV resin is not very sticky on smooth surfaces, but I needed to be fast for all these leaves. They had to be on, long enough for the copper to secure them.


 Anyway, it took me a while to glue all of them with the UV Lamp.


To repaint all the joints with Conductive paint I needed the same amount of time, but I finally manage to get it done.

With a cotton swab and a little solvent, I cleaned some smudges that I made on the stones.


I wrapped around the tree a piece of thin copper wire to hang it on the cathode rod of my tank and get it ready for the bath.

 And the cork proved to be such due to its fame. It's floating! I had to add a stiff wire on it to keep it underwater. 

 Start the power supply to the minimum current flow and leave to get coated in copper.

 I checked it every once in a while and when I saw that the cork part was completely covered in copper I change the position of the tree.

 Since it had a few spots uncoated, I crank up the current and let it be. Sadly the brightener fades off, so I had to add some more and, after not much longer, it starts to shine again, and I removed it from the tank.


 I washed off the tree all the electroforming solution residue and I put it in a container with water and a big amount of Liver of Sulfur because I wanted it to be black.


After an hour or so, I took it out and wash the residue. 

I didn't toss all the yellow liquid in the sink this time because it was too much, so kept it in the same container with the lid on. But remember, every time you wanna get rid of Liver of Sulfur, you need to neutralize it with bleach.


Now I'm going to finish the tree with two bristle brushes. I put on my respiratory mask and start with the 600 grit to expose the copper on the trunk, roots, and branches.


 I used the 2000 grit on the base to leave it black. This bristle is not as strong as the 600, so it will only make the black color to shine.


I hope you will be enjoyed by this project. Watch the video I have on YouTube, and please subscribe for more tutorial like this one.
 

Thank you all. Cuforming.

Sunday, May 8, 2022

Graphite Conductive Paint Recipe for Electroforming


 Lots of people still don't understand how it is Possible to make electricity go through insulating materials. Well… Conductive paint is the answer! In this video, I'm gonna show you how to make and use Graphite Conductive Paint. If you wanna try this DIY recipe, you can find it on my Beacons page from the link below.

To celebrate 200 Subscribers on my YouTube Channel and the “Love a Tree” Day I will announce 10 giveaways of this recipe in my next Video on May 16th. Please Subscribe to my YouTube Channel and comment “I Love Trees” in the comment section to be selected for the giveaway of the Conductive Paint Recipe. Thanks to all of you!!!

You can get the “Graphite conductive Paint Recipe” from “HERE”


Mix the ingredient in the way described in the recipe.

Application

First method:

 Just like any other paint, you can brush it on your piece. This simple and easy method will leave strokes on any plain surface. If you are planning to make a smooth surface, this is not the right way to apply the paint. Do it if you wanna make a standing texture.


Second method:

For a much more uniform result, the best way to apply the paint is by tapping it with a brush on top of your piece. Any original texture belonging to your pieces will being shown on the final copper coat.


Third method:

If you are planning to paint things that don't hold their shape well such as feathers, fresh leaves, fabric, or paper you can use an airbrush. It will deposit a thin coat of paint in a way that it won't alter the shape. This method require more than one layer of paint to be applied.


Fourth method:

This is the easiest and faster way to apply a prominent coat of paint in just one move. Dip directly your piece in the container and that's it. You only need to be aware of the porosity of your piece. A very porous piece can stay in the paint for just a second, for plastic's objects a few seconds more would be better.


How to make your paint more thin or thick:

If you leave the paint on a shelf, the ingredients in it will settle, and you will see a layer of solvent on top. Just remove some of that solvent with a dropper to thick the paint. If you wanna make it more liquid (to use it with the airbrush) just add a little bit of solvent to your taste.

Some issues:

The tendency of the paint is to settle and the components to get separated, so you need to mix it once in a while. Stir it or shake it to blend it well.

When you put into an electroforming bath a piece that is covered with conductive paint, it could happen sometime that bubbles will appear on the surface of the graphite. To solve this problem, you can just brush them away with the same electroforming solution of your bath to get all the spots wet. If you leave the bubbles on it, the air will prevent the copper to adhere to the graphite. This issue can happen on organic material such as any plants parts.


List of  surfaces that can be covered with this paint:

  • Dry leaves
  • Fresh leaves
  • Lace
  • Paper or cardboard
  • Stones
  • Bones
  • Plastic
  • Wood
  • Bark
  • Glass
  • Feathers
  • Plaster
  • Branches
  • Teeth
  • Insects
  • Resin
  • Fabric
  • Shells
  • Wax
  • Ceramic
  • .....and more.

 Watch the video on YouTube and subscribe.


Thank you all. CuForming.

Necessary Steps

How to Make Patina on Copper with Everyday Items

  Achieve Stunning Patinas on Copper with Everyday Items! Copper's natural beauty is undeniable, but a patina adds a whole new level of ...