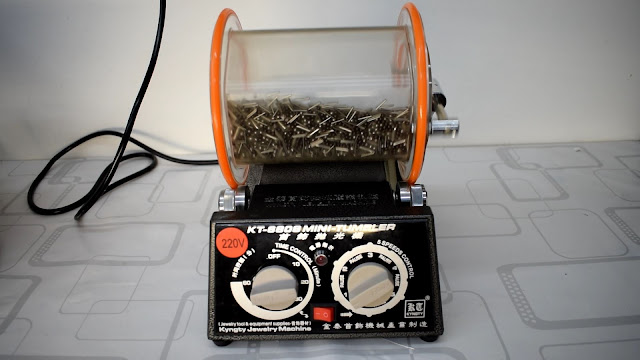
In this second part of my polishing series, I’m focusing on how to use tumblers to polish copper electroformed jewelry. Tumblers are incredibly helpful when it comes to smoothing surfaces, improving conductivity before electroforming, or brightening up a piece after applying a patina. I’ve tested three types: a vibrating tumbler, a rotary tumbler, and a magnetic tumbler (the last one generously provided by VEVOR).
Whether you're dealing with a dull surface, leftover oxidation, or intricate details that are hard to polish by hand, these machines can make a big difference. In this blog post, I’ll walk you through my setup and process for each tumbler, share my experiments with DIY burnishing compounds, and give you tips to get the most out of each tool.
🧰 Supplies Used
-
Vibratory tumbler https://amzn.to/44CAFDI | https://bit.ly/3I1bMsz
-
Rotary tumbler https://amzn.to/4l8SqAw | https://bit.ly/4eqIWxP
-
VEVOR magnetic tumbler https://amzn.to/4kcQk1i | https://bit.ly/4lu4nQT
-
Walnut shell media (0.4–0.8 mm) https://amzn.to/44pKFiE | https://bit.ly/46kpuAW
Stainless steel media pins https://amzn.to/3TcnjI3 | https://bit.ly/4kei59w
Stainless steel shot mixed media https://amzn.to/46hyIOf | https://bit.ly/4lxYKl1
-
Carbon steel shot media
-
Dish soap https://amzn.to/4kehxAu | https://bit.ly/44Fpbzq
-
Phosphoric acid https://amzn.to/448ITDu | https://bit.ly/4emS5HQ
-
Handmade soap https://amzn.to/3ZTMFyd | https://bit.ly/4l3Inwu
-
Acidic toilet cleaner https://amzn.to/45H2rjB | https://bit.ly/4nqD1gy
-
Air Compressor https://amzn.to/4ki6erl | https://bit.ly/4lxZeHR
-
Distilled Water https://amzn.to/4lnWLzu | https://bit.ly/4lAz0Vb
-
Latex masking https://amzn.to/4lt1H66 | https://bit.ly/44pDuqH
-
Electrical Tape https://amzn.to/4l1F9tj | https://bit.ly/3TO4TgS
⚙️ Step-by-Step: How I Use Each Tumbler
1. Vibratory Tumbler – Prepping Graphite-Coated Pieces
I use the vibrating tumbler before electroforming, when my pieces are still coated in graphite. It’s filled with fine crushed walnut shells (0.4–0.8 mm), which are gentle enough to avoid damaging details, but effective in evening out the graphite coat and removing brush strokes.
This process boosts conductivity, especially useful for pieces with deep textures or delicate designs where a rotary tool can’t reach. I usually set it for 15 minutes with just a few pieces at a time.
Important:
After tumbling, there’s a layer of fine dust left on the surface. Blow this off with a compressor. If your conductive paint is solvent-based, you can also rinse with water and let the piece dry. If it's water-based, avoid water and just use air.
💡 I don’t use this tumbler for fragile pieces like leaves, only sturdier ones like organic shapes or 3D prints.
2. VEVOR Magnetic Tumbler – Polishing Intricate Details
The magnetic tumbler from VEVOR uses a rotating magnetic field to spin tiny stainless steel pins that polish your jewelry. It’s ideal for intricate details, textured surfaces, or removing oxidation without taking off too much material.
It features:
-
Transparent barrel (so you can see what's going on)
-
Time knob (up to 1 hour)
-
Direction switch (reverses rotation every 5 minutes)
For my tests:
-
I added water to the mark line
-
Threw in the stainless steel pins
Used a DIY compound of dish soap + a mild phosphoric acid solution to polish clear pieces
-
Used a DIY mix of grated handmade soap and ammonia to polish pieces with black patina
In just 20–30 minutes, you can see results: matte finish, brighter copper tones, and a cleaner look, without harsh abrasion. I also tried a high pH mix using grated handmade soap and ammonia to preserve the black patina.
Pieces that were very rough need 1 hour of work for a perfect shine surface.
💡 The tiny pins reach into tight crevices that other tools miss, and if you add larger pins, you can get an even brighter shine. Just be careful when removing the barrel, those magnets are powerful.
If you're interested, there's a discount link in the video description with a 5% coupon code site-wide from VEVOR.
3. Rotary Tumbler – Burnishing with Steel Shots
This is my go-to for traditional burnishing. The rotary tumbler uses gravity to move various steel shot media inside a rotating barrel. It’s fitted with:
-
Speed adjustment
-
Timer knob
-
Direction switch
The media I use includes:
-
Stainless steel: spheres, half-nails, UFO shapes
-
Carbon steel: darker, slightly abrasive but more prone to rust if not dried at the end of the job
Once loaded with pieces, steel shots, water, and some compound, I let it run for 30 to 60 minutes—sometimes up to 2 hours for larger or dull pieces. This doesn’t remove much material, so it’s safe for keeping fine details intact. It simply hardens the surface and adds shine by rubbing it.
Remember to mask off stones or fragile areas with tape or latex.
🧪 DIY Burnishing Compound Experiments
I tested several household compounds to see how well they worked in the tumblers. Here’s what I found:
-
Dish soap – Easy to use, reduces friction, basic cleaning
-
Dish soap + phosphoric acid – Boosts brightness noticeably
-
Vinegar – Safe acid option, but works slowly
-
Handmade soap + ammonia – Good cleaning, softens black patina nicely
-
Ammonia (alone) – Works well for patina retention
-
Acidic toilet cleaner – Aggressive, useful for deep cleaning
💡 While it’s fun to experiment, for professional results, I still recommend using products made specifically for metal polishing.
🏁 Conclusion
Tumblers are incredibly versatile for jewelry work, especially when it comes to electroforming. Each one has a specific purpose:
-
The vibrating tumbler is great for prepping graphite coated surfaces.
-
The magnetic tumbler is fast, precise, and ideal for detailed or patinated pieces.
-
The rotary tumbler gives a traditional, polished finish using steel media.
Used correctly, they save you time, give consistent results, and help you elevate the finish of your work.
Thanks for reading, and thanks to everyone who supports the channel. If you haven’t already, watch the full video on YouTube to see all the machines in action, and don’t forget to like, comment, and subscribe.
See you in the next one! Cuforming.


Comments
Post a Comment