
Welcome to this comprehensive guide on crafting arrowhead jewelry using 3D printing and electroforming techniques. In this tutorial, I'll take you through each step of the process, from designing intricate arrowhead shapes in Blender to adding the finishing touches with stunning patina effects. But here's the exciting part – the arrowhead designs featured in this tutorial are not only the result of meticulous design work in Blender, but they're also available for you to use! These designs, meticulously crafted, are accessible to anyone who wants to create their own unique jewelry pieces. You can find them in my shops to the STL files for these designs which can be printed right away. So, without further ado, let's create these beautiful and unique pieces that are sure to impress and unleash your creative potential!
Check my eBook Shop: https://beacons.ai/cuforming
CHECK MY ETSY SHOP: https://www.etsy.com/shop/cuforming
Materials:
- Resin 3D printer https://amzn.to/3Twlgzi | https://ebay.to/3PicyCx
- Rotary tool https://amzn.to/48YAS3m | https://ebay.to/44B9mqs
- Medium grit rubber bit https://amzn.to/3VhJlv5 | https://ebay.to/48P3ZGe
- Copper wire https://amzn.to/3Iw36HA | https://ebay.to/43dLPww
- Pliers and Nippers https://amzn.to/3TzcMYt | https://ebay.to/4c8OlIt
- Conductive paint https://youtu.be/WUaX2Js64-Q
- Stones (optional) https://amzn.to/3TbP5E0 | https://ebay.to/3uVxOHi
- CA Glue https://amzn.to/48UQdBI | https://ebay.to/3wOcowj
- Electroforming set up https://kit.co/cuforming/electroforming-advanced-kit
- Liver of sulfur https://youtu.be/0Fu5KQ94AsM
- Electropatina https://youtu.be/M6U_wIUnH-E
- Protective gear (gloves, goggles, mask) https://amzn.to/3Pf3RIQ
Designing in Blender: Creating the arrowhead designs in Blender was a labor of love, requiring careful attention to detail and countless hours of refining. However, I'm excited to share that these designs are available for anyone who wants to create their own stunning arrowhead jewelry. You can find the STL files for these designs on my shops, making it easy to bring these unique creations to life. These files are accessible to all, allowing you to unleash your creativity and craft beautiful jewelry pieces that are truly one-of-a-kind. Go get those files and start crafting!

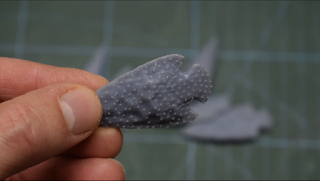
Printing with Resin 3D Printer: Time to bring those designs to life! Import the STL files you like in your slicer software and be sure to print them at 45° angle to ensure a perfect printing without any issue. Load up your resin 3D printer with the resin of your choice and hit print. Layer by layer, until your arrowheads are solid and ready to go. When it comes to detailed and textured designs, I always opt for a resin 3D printer for optimal results. The resin printing process ensures that the intricate details and textures of the original design are faithfully replicated in the final printed objects. This method preserves the fine intricacies of the arrowheads, ensuring a high level of detail and quality in the finished pieces.


Polishing Support Marks: After 3D printing your arrowhead designs, support marks can often be found left behind from the printing process. These marks can detract from the overall appearance of the piece, but they're easily remedied. I use a rotary tool equipped with a medium grit rubber bit to gently polish away these support marks without causing any damage to the surface of the arrowheads. The rubber bit provides just the right amount of abrasiveness to effectively remove the marks while preserving the intricate details and textures of the design. With a steady hand and light pressure, we'll work our way around the arrowheads, ensuring that each one is left with a smooth and flawless finish.


Adding Bail with Copper Wire: Grab some copper wire and get to wire wrapping. Create bails for your arrowheads, making sure they're sturdy and secure. This step not only adds a decorative element but also serves a functional purpose, it will be where you attach your chain or cord later on. You'll find plenty of resources on YouTube offering tutorials on wire wrapping techniques, making it easy to learn and master. There are numerous ways to create a copper bail, so feel free to get creative and experiment with different designs until you find one that suits your aesthetic. It's essential to use copper wire for the bail to ensure conductivity during the electroforming process. This conductivity allows the electroforming solution to start properly the deposition of copper to the surface of the arrowhead, resulting in a uniform coating.

Conductive Paint: To prepare your arrowheads for the electroforming process, you need to make them conductive. With my conductive paint formula, one dip in the conductive paint, can assure your arrowheads will be ready to go in the electroforming thank. This formula is designed to provide optimal conductivity with minimal effort, ensuring that the electroforming solution adheres effectively to the surface of the arrowheads. You can find the recipe for this conductive paint formula available for purchase in my stores, making it easy to replicate the process for your own projects.

Adding Stones: Take your arrowheads and carefully glue on some stones to make them really stand out. Get creative with your placements and combinations for a unique look. After gluing the stones onto the arrowheads, it's common to notice gaps between the stones and the surface. To ensure a perfect coating, these gaps should be filled with a little more conductive paint. This ensures that the entire surface of the arrowheads remains conductive, allowing for uniform copper deposition during electroforming. Once the gaps are filled and the arrowheads are fully coated with conductive paint, they'll be ready to move on to the next step in the electroforming process.

Electroforming: It's time for the magic to happen! But, before beginning, it's crucial to calculate the surface area of your arrowheads to determine the appropriate amount of current to apply. This calculation can be done using a function in Blender. Alternatively, you can use my method, which I've explained in detail in my previous tutorial and video.

Once the surface area is determined, you can set the current according to the constant numbers I show in my previous tutorial and video. In this case, I opted to apply 0.80 amperes of current, ensuring a consistent and controlled electroforming process. With the current set, your arrowheads are ready to be immersed in the electroforming tank.


After 18 hours of continuous electroforming, your arrowheads emerged without any issues. The process proceeded smoothly, and the result is a bright copper coating that adheres evenly to the surface of the arrowheads. With the electroforming process complete, your arrowheads are now ready for the final step: adding patina to enhance their appearance

Patina with Liver of Sulfur and Electropatina: Now for the finishing touch! Once your arrowheads are electroformed, it's time to add some patina. You can use liver of sulfur for a dark, antiqued look, or try out some electropatina for bright rainbows. Experiment and see what speaks to you!
Liver of Sulfur Patina: Liver of sulfur is a chemical compound commonly used to create a dark, antiqued patina on metal surfaces. By immersing your arrowheads in a liver of sulfur solution, you can induce oxidation, resulting in a rich and various shades of colors and rainbows, to a blackened finish. This process adds a sense of depth and character to the copper coating, giving your jewelry a timeless and rustic look.

Electropatina: On the other hand, electropatina offers a more controlled and versatile approach to patina application. This method utilizes electricity to create a range of vibrant colors and effects on the surface of the metal. By varying the voltage and duration of the immersion, you can achieve an array of colors, from bright rainbows to subtle gradients. This allows for endless experimentation and customization, allowing you to create truly unique and captivating jewelry pieces.

Both liver of sulfur patina and electropatina have their own distinct advantages and can enrich your jewelry in different ways. Patina allows you to elevate your arrowhead jewelry to new heights of beauty and sophistication.


For a visual guide to this process, be sure to check out my accompanying YouTube video tutorial, where I walk you through each step in detail.
I hope this tutorial has inspired you to create your own stunning arrowhead jewelry using 3D printing and electroforming techniques. If you're interested in trying out some of the designs featured in this tutorial and more, you can find the STL files available for purchase on my shops
Check my eBook Shop: https://beacons.ai/cuforming
CHECK MY ETSY SHOP: https://www.etsy.com/shop/cuforming
Thank
you for joining me on this crafting journey, and happy creating!
Comments
Post a Comment