Nuts and Geodes have something in common, you crack them open and something awesome pops out of them.
A delicious seed or shiny crystals. With nutshells and crystals, I make these hybrid jewels.
The inspiration came from those little dioramas made inside walnuts. I saw a few of them on the internet and I had to make my version.
For this project, I used this material:
- Walnuts and Hazelnuts
- Quartz crystal points
- Sand paper
- Mirror effect Varnish
- UV Resin
- 2.5 mm Copper Wire
- Pickling solution
- 401 CA Glue
- Relief Paint
- Graphite Conductive Paint
- Electroforming Solution
- Distilled Water
- Liver of Sulfur
- Baking Soda
- Zapon Lack
- Jump-rings
- Jewelry chain
- Lobster clasp
and these tools:
- Ball Peen Hammer
- Steel anvil
- Wood chisels
- Brass wire brush
- Rotary tool
- Steel Burrs bit
- Flat nose pliers
- Diamond cutting wheel
- My DIY Tank Dropper
- UV Lamp
- Disposable Gloves
- Cloth pins
- DIY Texturing Hammer
- Propane torch
- Heat-proof surface
- Various glass containers
- Torque lock clamp
- Tweezers
- Steel mandrel for rings
- Rubber hammer
- Various brushes
- The complete setup for electroforming
- Radial Bristle brushes

Obviously, the first thing you do is to crack the nuts…. Yeah!!! We need to do it in a way that they get opened symmetrically. For the walnuts is relatively easy. For hazelnuts, we wanna ask for some luck.


After several attempts, I managed to open a few, more than I needed. I start to clean the inside of the shells with wood chisels to remove the soft parts. A little clean with a brass wire brush and to remove hard parts I used my rotary tool with a steel burrs bit.


With a piece of sand paper, I flatted the edges of hazelnuts shells, but this step is not necessary.

Once everything is nice and smooth, I painted the inside of my shells with a Mirror Effect Varnish.
This step is necessary to give some luster to the crystal that we are going to mount inside.
Before we proceed to glue our crystals inside the shells, we need to do some adjustment.
I had these Quartz Crystal points that I bought in stock, and they were too long to be insert inside. I needed to make them shorter. So I start to break some of the smaller ones I had with my flat nose pliers but, I wasn't able to do that with the bigger ones. I needed to change tool.


The best way to cut gemstones is with Diamond cutting wheel. With my rotary tool I cut a few of them and immediately realized that a lot of silica dust was flying everywhere. I could have used a respiratory mask, but the common practice is to use water.
I activate my brain and I made a water tank dropper for my rotary tool (Check the video on YouTube).

In about an hour, I cut enough crystals for the entire set.

To glue them inside the nutshells, I used UV resin.
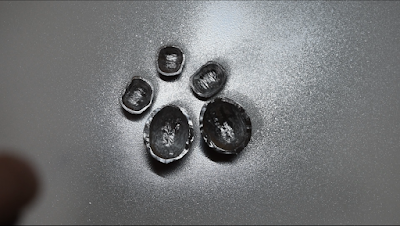
Patiently, with tweezers, I manage to complete the whole set. I fit in all the crystals and cure them, one by one, under the UV Lamp.


The set is composed of a Pendant, a pair of earrings and a ring.
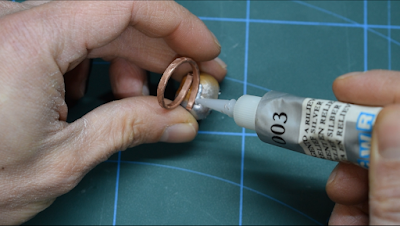
The hardware for the pendant and earrings is premade. I only need to make a copper ring with some copper wire.
On my anvil, I flatten a bit the copper wire with a ball peen hammer and, with my DIY Texturing hammer, I made some movement on the surface of the ring.


I annealed it with my propane torch and, after quench it in water, I put it in pickling solution to remove all the fire scales.


With a steel mandrel for rings, I bent it in shape to the right measurement. With a rubber hammer, I hit it a little to make it harder. This process is not very important, since the electroformation will make the copper very strong.

It's time to glue the parts together.
Jump rings can be glued with UV resin on the pendant and earrings.
UV light can't penetrate copper or nutshell, so I thought that the best solution for the ring, would be 401 CA Glue. It becomes super strong in less than 15 mins.


After that, the ring had gaps between the copper and the shell that needs to be filled. My favorite product to do this step is Relief paint. It's easy to use, and it doesn't take long to dry.
Next step is graphite paint.
I use a solvent based graphite paint, so it needs to be shaken before any use.
With a brush, I paint meticulously all edges and the front of the shells, being careful not to exaggerate with the coat and cover the natural texture, especially for the walnut.

One hour or more to get the conductivity of the paint activated, and they are ready for a dive in the electroforming solution.

I set my power supply on 0.3 volts without doing any calculation of the surface of the pieces. I had 0.09 amps to start. The amperage will go up once the piece get coated with copper. It's impossible to make a calculation when it's only cover with graphite. For me, measuring inches square and multiply for amps it's a waste of time.

I dipped all the pieces and checked them after 2 hours. As you can see from the picture, the graphite is still visible.

In total, this process took 16 hours to be completed. With low voltage and slow process, you can get better and stronger objects.

After washing the residual copper sulfate with distilled water, I painted all the shiny copper parts with Liver of sulfur. It is a toxic chemical that smell like rotten eggs. Use it in a ventilated area or with a respirator mask.

Usually I dilute it in water and then submerge my pieces in it. This time I wanted to be accurate and paint the edges of the shell without damping crystals in this yellow toxic stuff.
In this way the oxidation occur faster, and after I submerge them in baking soda solution, the black oxide got peeled off of the surface. We will have 3 colors, orange, pink, and gray.

To remove the remaining black oxide and highlight these colors, I used, with my rotary tool, radial bristle brushes.

A 600 grit to get all the black off, and a 1000 grit one to bring up some gloss.


To keep all shiny, I used a transparent lack called “Zapon”. It's a holes filler and it prevents oxidation.
Before any use, it must be diluted with nitro solvent to make it more liquid.
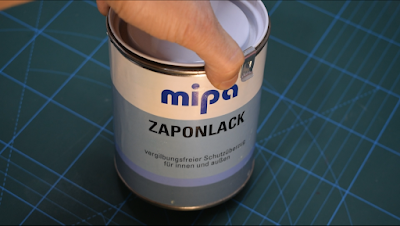
To apply it, I submerge all the pieces for a few seconds in it and then rotate to make a centrifugal effect to remove the excess zapon. It needs at least 2 days for a complete cure.

A pair of hooks for the earring and a chain with a lobster clasp for the pendant complete this project.

I hope you like it. Check the video on YouTube.
Thank you all! CuForming.
Comments
Post a Comment