In the late summer, I was wandering through the woods and I noticed that one species of tree was starting to lose its leaves.
For me, that was an interesting thing. The fascinating thing was that those leaves were heart shaped. That gave me a reason to collect some and bring them home to make something out of them.
A month ago, I finally decided to create this set of jewels.
I saw these small carnelian and blue agate cabochons and instantly thought they can be good together.

Here all the material I've used for this project:
- Poplar leaves
- Cabochons
- Copper wires of different diameters
- Toothpicks
- CA Glue
- Silver paint marker
- UV Resin
- Acetone
- Pickling solution
- Conductive Paint
- E6000 Glue
- Relief paint
- Electroforming Solution
- Liver of Sulfur
- Baking Soda
- Distilled Water
- Jewelry hardware
and all the tools:
- Nippers
- UV lamp
- Ball peen hammer
- Rubber hammer
- DIY texturing hammer
- Anvil
- File
- V Slot bench
- Gas Torch
- Heatproof surface
- Round nose pliers
- Flat nose pliers
- Scissors
- Cloth Pins
- Bracelets Mandrel
- Rings Mandrel
- Ring Size Mandrel
- Mason Jars
- Airbrush
- Brushes
- Various plastic containers
- All the electroforming supplies described in the previous post
Working with dry leaves always bring us to an issue. They are crumbly, so they can break in to our hands anytime.
The first thing I'm gonna do, just with one leaf, is to soak it in water overnight for the reason I will describe later.

This project is all about preparation.
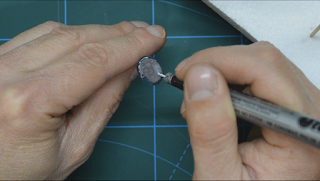
If we dop cabochons, it's easier to handle them while we are painting the bottom with silver paint. I'm just attaching a toothpick on top of each cabochon with CA glue.

The silver paint will enhance the luminosity of the stone, since they will be glued facing the black graphite paint.
The next step on the preparation is to glue all the hardware on our leaves.
With UV Resin, I'm gluing jump-rings on the smaller leaves to make the earrings.

UV Resin will harden under UV Light. The most common tool for this job is a fingernail's UV Lamp.

For the pendant, I choose to put two leaves together.
I've decided not to use regular jump-rings, so I'm making two jump-ring-holders with copper wire.
Just flatting two small portion of 2.5 mm copper wire with hammer and anvil.

After being hammered, the copper become too hard to be shaped, so I'm gonna annihilate my two pieces with a torch to get them soft enough to be worked. Then quenching in water and clean fire scales in pickling solution.
Round the edges with a file on a V Slot bench. And shape them with a round nose pliers, and a flat nose one.


I glued the handmade jump-ring on both sides of those leaves and then glue all parts.
For this process, I used a medium viscosity CA Glue: 401 Korean Glue.


For the bracelet, I'm using the same 2.5 mm copper wire. Cut approximately 10 inches (ca. 25 cm). On the anvil, I use now a DIY Hammer for texturing. I made interchangeable heads with bolts.


To shape the bracelet, I use a wooden mandrel and the rubber hammer.

I do the same texture on the ring and shape it with a ring's steel mandrel.

The most common size of rings is 7.5 (approximately 18 mm). To measure that, I use a simple measurement mandrel.

When hands touch copper or basically anything, they will release grease. This will cause fast oxidation or in the worst case scenario the copper ions during the electroforming process won't stick on your piece. That's why I always wash metal pieces with acetone. Alcohol can work as well for the purpose.
Now it's time to remove the leaf that I put in water to soak. It's soft enough, so it doesn't crack or crumble on my hand while I cut some oval shape to put under the cabochons for the bracelet and the ring.

To glue them in place, I use my 401 superglue.

After gluing pieces together, there will always be a gap between them. In this case, there is a gap between the oval leaves and the copper wire. The solution is to fill the holes with something like clay, resin, tons of layers of conductive paint or, relief paint.


And it's time for conductive paint. I dip the bracelet and the ring directly in the jar. Earrings and the pendant are made entirely of leaves so, to maintain the texture and grains of them I've decided to paint them with the airbrush to have a thin layer of paint.


Now that we covered all the pieces with conductive paint, we can mount our cabochons. The best glue for this step in E6000 glue. It will set in 24 hours, but it's worth it because it's very strong.


Then, they finally go in to the tank.

To be sure that the conductivity of the entire circuit is perfect, I always add cloth pins to keep the hooks in contact with the cathode bar.
I make all my electroforming solutions on my own, and this one in particularly is made for a thin and shiny copper cover. The reason I use this mixture is that I want to see the grain of the leaves.
Once they are ready, I remove them from the tank and wash the excess copper sulfate in distilled water for the next step.

This is the funniest part of the job. Making patina.
We need two plastic containers with distilled water. In the first one we add liver of sulfur, in the other one baking soda.

Liver of sulfur is the chemical substance used to color copper. It oxidizes the metal. Coloring metals with liver of sulfur it's a matter of time. If we leave our piece in for a few seconds, this substance will oxidize the metal a little bit creating different colors and shades of orange, brown, blue, purple, gold.
Leaving our piece longer will turn the pieces black. In this case, it can be sand to reveal the copper color under it.
In this project, I've decided to make a colorful patina. After we dip the piece in liver of sulfur, we instantly dip it in the baking soda solution to neutralize the reaction.
Liver of sulfur has an intense smell produced by the evaporation of the sulfides, just like rotten eggs. It's recommended to use a respirator mask or work in a ventilated area.
Also, after we are done with our job, we need to neutralize it with baking soda or leave it to evaporate before flushing in the drain. It's a toxic substance, we don't want to contribute to pollution.
The last step to complete our jewels is to mount the hardware.
Hooks for the earring and a chain and a clasp for the pendant.


The ring and the bracelet are good as they are.

Here's the video on YouTube about this project. Please watch it and subscribe to my channel for more.
Comments
Post a Comment